Tuesday, November 26, 2013

Dinner Club gone Retro

Recently I hosted our dinner club group for a super fun meal.  The couple that hosts gets to pick the theme and is responsible for assigning the remaining couples a dish to bring.  Usually we are given a category like salad, vegetable or dessert and we may pick any recipe we like.  I thought I would shake things up a bit and have a throw-back soiree!

Daddy-o and I elected the theme "Kitschtastic Awesomeness" with the main course being Thai Tiki Turkey Meatloaf.  The 4 other couples were each assigned one of the following: appetizer, gelatin, vegetable and dessert.  They were then instructed to visit Mid Century Menu or The Charles Phoenix Test Kitchen and pick a recipe from one of the sites that fell into their respective categories.  Of course, all of the guests were made aware that any dish could be a gelatin dish even if they were not expressly assigned gelatin.  The more Jello the merrier, right?!

When all was said and done we ended up with BBQ meatballs, celery with pimento cheese spread, an astro-weenie pineapple, meatloaf, potato salad jello, pineapple carrot jello ring, green bean casserole and pistachio pudding crisp dessert.  It was, well...kitschtastic awesomeness at it's best!  Even if it felt a bit like a church social.


Guests were also instructed to dress in vintage, tropical or Bradyesque attire.  I'm so happy to report that everyone complied and looked great! We had a fantastic evening that included tiki drinks mixed by Daddy-o.  I love my friends and am eternally thankful to them for humoring me!


Thai Turkey Tiki Meatloaf 
(adapted from Weight Watchers Hawaiian Turkey Loaf)
3 Tbsp Orange Juice
5 Tbsp Fish Sauce
2 tsp Red Curry Paste
1 tsp chopped Garlic
1 Red Pepper, chopped
1/2 Onion, chopped
6 slices fresh Ginger (quarter sized)
38 ounces ground Turkey
1 cup breadcrumbs
2 eggs
Pineapple Chutney
8 ounces crushed Pineapple
2 Tbsp Sugar
2 Tbsp White Vinegar
2 Tbsp chopped Onions
2 Tbsp Red Pepper, chopped
1 Tbsp minced Ginger
1/4 tsp Red Pepper Flakes
1 Tbsp Cilantro 
Directions:  Preheat oven to 350F.  In a food processor or blender, combine juice, fish sauce, curry paste, garlic, red pepper, onions and ginger.  Process until it is a fine puree.  Pour puree into a large bowl and add turkey, breadcrumbs and egg.  Blend everything well with your hands, put into a loaf pan that has been coated with non-stick spray.  Now get creative and make the finest looking tiki head you can.  Br sure to make spaces for cherry eyes!  Bake for 45-60 min using a meat thermometer until the center reaches 164F.  Remove from oven and don't panic...there will be a collection of oogoo in the eye sockets and mouth of your tiki.  Simply use a spoon to skim this off.  Let the meatloaf stand for 5-10 minutes before removing from pan.  After placing on platter, add cherries and pineapple to give your tiki some pizazz.
For the pineapple topping:  (while meatloaf is cooking)
In a microwave safe bowl, combine pineapple, sugar, vinegar, onions, red pepper, ginger and pepper flakes.  Microwave on high 3-5 minutes.  Let stand in microwave for another minute or two.  Add cilantro and serve over top or alongside the meatloaf.


Wouldn't it be awesome if your guests showed up to a turkey dinner like this on Thanksgiving?  I know I would LOVE it!
 
Happy Thanksgiving to you and yours!
 
'Til we meet again,
Ms Adventure

Wednesday, October 23, 2013

Tidbit Redo

So...I have a serious obsession with tidbit trays.  I don't know why.  Perhaps it's because I don't ever remember having one when I was growing up, or because they always seem to be such an elegant addition to a cocktail party, or maybe because they utilize vertical space thus preserving precious table space on your buffet.  Whenever I see a tidbit tray (TBT) at a thrift shop I have a hard time passing them up but, really, how many of these marvels of snack service does a gal need?

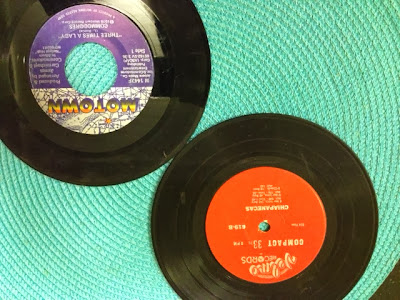
As fate would have it, I was cruising one of my local haunts and spotted a new-in-box TBT setting upon the shelf.  At only $1, I had zero chance of resisting.  As I pick it up I had a thought...why not change it up a bit?  Records!  Since I have boxes of albums (33's and 78's) this would be easy.  I knew that I wanted to have graduated sizes for each level so I went on the hunt for a 45 to be the smallest top tier.  I'm sure it's been done before but it was quick, easy and oh so cute!


My original plan was to use a 33 for the bottom level, a 78 for the middle and a 45 for the top.  Unfortunately this tidbit did not come with a base and I felt that just having an album in the bottom with no foot to sit upon would just be too unfinished for my taste.  Maybe, just maybe, I would be able to use another 78 for the base and set it inside the lip of the actual tray.
 
Shazam!  That worked brilliantly!
 The next issue to conquer was that of the large center hole in the 45.  How would I fill that?  Just then I spotted a compact 33 in the vinyl bin.  It's the same outer diameter of a 45 but with the same center post size as the other albums.

Now with all of the kinks worked out, it's just a matter of assembling it all..  The bottom screw connected to the lower rod, the lower rod connected to the center rod...Sing it with me...center rod connected to the top loop....


I think the finished tray is super adorable.  It will be a great addition to my ever growing collection!


'Til we meet again,
Ms Adventure

Monday, September 30, 2013

Tour de Toit


 Last week I participated in the Tour de Troit, a 30 mile non-competitive bicycle ride around Detroit.  This is my third year doing the ride which just happened to fall on my 40th birthday.  The ride raises awareness of biking as a mode of transportation; publicizes the growing greenways network in the City of Detroit and all of Southeastern Michigan; and raises funds for greenway development in Detroit, including the Southwest Detroit Greenlink.

Although the ride is non-competitive, there tends to be an abundance of spandex toxicity; that is, folks who seem to take the ride far too seriously.  In an effort to combat said spandex toxicity my friends and I have formed Team Lounge Leopards.  We wear uniforms in my favorite shade of leopard and pipe tunes from the basket of my bike by the likes of Dean Martin, Ella Fitzgerald and Frank Sinatra.  We have also been known to carry a case of PBR in a cooler on Daddy-o's bike.  Must stay hydrated you know!

Since the ride was part of my 40th Birthday Celebration Extravaganza, I felt the need to accessorize my bike helmet more so than the usual flower clip that I normally wear.  In a rare stoke of genius, I came up with an idea so grand it would make headlines all over the state.  Behold...
AP Photo/Detroit News, Todd McInturf


Team Lounge Leopards


The beast has been spotted!

The Tour starts at the Michigan Central Station.  This was once the main passenger rail hub of Detroit.  Since the last train rolled out in 1988 the building has come to symbolize the blight that has plagued the city.  To read more about the history of this beautiful building click here.


Michigan Central Station
The tour winds it's way around the city through Corktown, the university district, the old Packard Plant, Indian Village and Belle Isle.  Some parts of the city are so run down while other areas are a shining jewel of what once was.  I often think about what the city was like in it's heyday.  How families were once so proud of the beautiful homes they worked so hard to build.  The same homes that remain abandoned burned-out shells of their former glory. 
 
Packard Plant then.
 
Packard Plant now.
 
Historic Indian Village homes.
The revival of Corktown is one of the success stories coming out of Detroit right now. This effort has been fueled by the growth of Slows Bar B Q. This block of Michigan Ave is a bustling hub which includes Astro Coffee and Sugar House. We went out for some craft cocktails at Sugar House to celebrate my big four-oh. I could drink here all day if they would let me. 


Corktown revival
 
The day was a blast and I am so fortunate to have been able to spend it with my family and friends.  I can't wait to do the tour again next year! 

'Til we meet again,
Ms. Adventure

Thursday, July 25, 2013

DIY Tropical Curtains

My favorite picture of my Auntie Hilda was taken during a Christmas celebration sometime in the 1950's.  My Auntie looks beautiful and Uncle Earl is quite dapper but the star of the scene are those amazing curtains in the background.  I really wanted to recreate that same feeling in my living room and dining area.  After much searching, I was unable to find just the right curtains which meant I was going to have to make them myself.

Let me start by saying I am NOT a seamstress.  That being said, I was super excitied to find a detailed online tuorial on Textile Love.  So detailed in fact, that it was broken down into three seperate entries. They can be found starting here.

After determining the amount of fabric I needed I placed an order with Barkcloth Hawaii.  Nyna is great to work with and made sure I was happy with my order.

Trimming the panels to proper length.
 
My dining room table proved to be the perfect work surface.  With both of the extensions in place it was nearly long enough to accomodate my unhemmed panels.

All ironed and ready for the lining.
 
For the curtain lining I cheated and used off-white flat sheets that I purchased from a local retailer.  They were really affordable and already hemmed so that saved me a few steps.
 

Just like the picture on the tutorial!
 
The instructions called for a blind hem down the sides of the curtain panels.  I've never even switched out the foot on my sewing machine so this seemed like a daunting request.  I was sure I would severly mess this up and ruin my fabric.  I resorted to a strategy I almost never use...I read the instructions for my sewing machine.  Let me tell you it was like some sort of voodoo.  Everything worked like a charm and looked fantastic!   


Wow!  That actually worked!
My curtains are designed to soften the room.  They don't close over the windows but hang at the edges of the windows.  Privacy isn't an issue and the view is far too nice to obscure.
 
 
I'm so excited with the final result! The pinch pleats were much easier to do than I had anticipated. All in all, it was a lot of work but totally worth it.


'Til we meet again,
Ms Adventure
 

Saturday, July 20, 2013

Feeling Lampish

Well, this weekend has turned very lampish and it's only Saturday!  As you may have gathered by now I have a severe lamp problem.  Is it really a problem?  I guess that depends on who you ask.  Most folk would say "yes, it's time for an intervention".  So, without further hesitation here is the haul from the last two days....


The first find is the gold TV lamp.  This little gem was filthy when I found it yesterday at a garage sale.  I LOVE that it has a built-in planter!  I paid $1 for it and giggled when I saw that it is stamped '24K Gold' on the bottom.  It cleaned up well, shining so bright now.  I can't wait to get some fake greenery in it!  I rewired the lamp but will need to tweak it a bit as the shade doesn't want to sit straight.  I'm thinking a cardboard washer may do the trick.


Lamp #2 was purchased this morning at the local American Legion Hall.  They were having a rummage sale fundraiser for the veterans programs.  I spotted it right when I walked in the door just sitting on the floor. I wasn't super in love with it, more of a strong like.  It has jewels embedded in the porcelain base and I don't have any jeweled lamps yet.  At $9 it was a little bit more then what I wanted to spend on it.  However, it was raising funds for a good cause and this is where the problem comes in...I needed to 'save' it.  Do I have room for it in my house?  No.  Did I already have a shade for it?  Yes (I have a small pile of lamp shades laying around the house).  So off I went with it.
 
The base was in poor shape with corrosion and rust.  After some quality time with some #0000 steel wool and a can of gold spray paint it was looking pretty good.  The black jeweled base sparkles after a good scrubbing.  I rewired the lamp and added a vintage shade. 
 
The final lamp I actually picked up a few weeks ago at an estate sale in Minnesota.  A beautiful little black cat lamp with a planter!  I paid $5, which I thought was a steal.  I added it to my little lamp rejuvenation party today giving it a good cleaning and new wiring.  The shade was in my lonely shade collection.  I've been looking for the perfect base for the pale pink venetian lamp shade.  I think they look fantastic together! 

 
We all have our "things".  For some folks its jewelry or purses.  For me it's lamps, lots and lots of lamps.  What's your weakness?  Do you have any collections?
 
'Til we meet again,
Ms Adventure


Thursday, May 30, 2013

Scotch Eggs

I just have to share one of my favorite breakfasts...Scotch Eggs!  I don't make these too often, usually on special occasions or when we go camping.  I like to make them the night before then reheat them when needed.


This is what you need...

Hard Boiled Eggs
Breakfast Sausage
Bread Crumbs


First, hard boil the eggs.  This may sound simple but for some reason, folks seem to have a hard time not overcooking the eggs.  You know when you get a yoke with green on the outside?  That's an overcooked egg.
I have chickens in my garden so the first thing I have to do is wait for two weeks before I hard boil the eggs.  Freshly laid eggs just wont hard boil nicely.  They just don't solidify correctly.
For perfectly cooked hard boiled eggs, place the eggs in a pot of cold water--enough to cover the eggs by one inch.  Bring the water to a rolling boil.  Boil for two minutes.  Cover and remove from heat.  Set a timer for 16 minutes.  When the timer dings, rinse eggs with cold water.  Let eggs cool then peel.

Dry peeled eggs with a paper towel.  Cut sausage into 1/2"-3/4" slices.  Flatten sausage and wrap around egg being sure to cover all of the egg and seal the edges.  I usually like to use Jimmy Dean Hot Breakfast Sausage.  I've tried using local made sausage but found the fat content to be too high.  The fat cooked off and left my eggs exposed.  Gasp!


Once the eggs are encased in sausage, roll them in bread crumbs.  Most often you will see Scotch Eggs deep fried but I prefer them baked.  Place the eggs on a cooling rack suspended above a cake baking pan. 


Bake in an oven preheated to 325F for 35minutes.  Serve with honey mustard for dipping.  Delicious!


I hope you give these a try.  They really are wonderful!

'Til we meet again,
Ms. Adventure


Monday, May 27, 2013

DIY "Retro" Lamp Shade

Earlier this year I picked up a great vintage lamp sans shade.  As you all know, vintage lamps are my Achilles heel.  This beauty depicts an Asian boy and girl on a boat.  I originally wanted a red venetian lamp shade but was unable to find one at a price I was willing to pay.  So it was time to get creative. 


I hit the local Target store and picked up a rectangle shade that would compliment the lamp nicely.  I think I paid about $12 for it.  Nice shape but boring, boring, boring.


I happened to have some vintage bark cloth curtains at home that I've been planning to make pillows out of for some time.  I picked them up at a local antique shop last year.  I love the colors and the pattern looks to be an oriental bonsai motif.


Step 1:  Wash and iron fabric.


Step 2:  Cut fabric for each side of the shade.  If using a drum shade you can cut one piece to cover the entire shade.  If the top of the shade is tapered then your fabric will end up more of a 'C' shape.                                                      Step 3:  Attach the fabric to the shade using spray adhesive.  Follow the directions on the can.


Step 4:  Attach bias tape to cover the edge of the fabric that was folded over the inside of the lamp shade.  This will give your shade a clean, finished look.  I used a product called Liquid Stitch to secure the bias tape.

 
Oooooh, doesn't that look nice!
 
Step 5:  Lastly, I added great chartreuse trim to cover the seams where the fabric meets at the corners of the shade.  I used Liquid Stitch to attatch the trim.
 
So overall, I ended up spending about $25 for the shade and all of the fabric, trim, bias tape and adhesives.  I think it turned quite stunning for a quick weekend project.
 
 
'Til we meet again,
Ms. Adventure

Tuesday, February 26, 2013

Jello Cookies


These colorful cookies are so simple and perfect for Easter.  Believe it or not, these tasty treats are made with Jello.  The ones pictured below are Berry Blue and Cherry.  Next week I think I will try Lime and Orange! 

Be careful not to brown the cookies--I did on the first batch of the blue ones which made them look a bit green around the bottoms.

Find the recipe for Jello Cookies on Mid Century Menu

I made a couple adjustments to the recipe as follows: 
  • Reduced the powdered sugar in the dough to 3/4 cup
  • Added 2 TBSP milk in dough to help it stick together
  • I found 9 minutes to be the perfect cooking time for my oven
  • For Cherry cookies- I swapped Almond Extract for Vanilla Extract in the glaze. 

Enjoy!

'Til we meet again,
Ms. Adventure